This was a great way to get started in the Holiday spirit. I think my ornaments turned out awesome. They did not look like the pin, but I actually them better. To actually make them like the pin, I think it would work best to break very small pieces of crayon and to not spend too much time melting them. But having the ornaments be covered in crayon can look amazing as well.
Monday, February 16, 2015
Melted Crayon Christmas Ornanments
This was a great way to get started in the Holiday spirit. I think my ornaments turned out awesome. They did not look like the pin, but I actually them better. To actually make them like the pin, I think it would work best to break very small pieces of crayon and to not spend too much time melting them. But having the ornaments be covered in crayon can look amazing as well.
Leaf Art parts I and II
Posted above is the final video for this project. The first video I posted was of my total fail in not being prepared to do the project. I was able to get through the most of the work in the first video. Collecting leaves, gluing them to a surface, covering it with aluminum foil and finally spray painting that foil black. In this video I get the steel wool and am able to essentially scratch off the paint to show through the details of the leaves underneath. The result was decent. I think using a solid surface for this project would have made the project both easier to do and look significantly better. I think I may try a similar project sometime in the future. If you have any ideas for similar projects let me know in the comments.
Ombre Pinecones
So I essential did this project just because I had extra pinecones from doing the hedgehog project. I figured it would be easy enough, and it was. But to my surprise I actually really liked the results. I even kept these proudly on display in my apartment through all of the fall and into the start of the winter. This project is great because you can do it in whatever color scheme you would like. Do you guys like when I do seasonal projects or is this something I can cut back on?
Pinecone Hedgehogs
This was a super cute and family friendly project to do. All you need is a pinecone and some polymer clay. After baking it I did have problems with the feet coming off. At this point one has only its front feet and the other is left with only one foot. But they were super adorable while they lasted and were not overly difficult to complete. Let me know if you like when I do kid friendly projects or if you would prefer I stick to more grown up projects.
Sunday, February 15, 2015
Nerdy Pumpkin Carving - Doctor Who Cyberman
This is obviously pretty straight forward. I carved a pumpkin for Halloween in the design of a Cyberman. The results we decent. But not as amazing as all the pictures I found. So essentially I am not a professional pumpkin carver and will likely never be.
Harry Potter Week, Deathly Hallows Charm
I suppose I should start by saying that my charm did not end up looking like the pin. This was for a number of reasons, cost being the biggest reason. The charms I made only cost a few dollars to complete and I like a lot since they are the House colours. For a few more dollars I think I would be able to do one more similar to the pin. The toughest part is making the sharp corners and the interior circle actual being round. I was able to accomplish it on a couple of the charms but not all of them. With a little practice you should be able to get some of them to look right. If you have any Harry Potter craft ideas go ahead and leave them in the comments.
Harry Potter Week, Make your Own Wand
This project was so simple and turned out amazing. All you need is some paper and a hot glue gun and you have a blank wand. Add some paint and this thing really comes to life. This thing can be done without very much time or effort and the results are pretty astounding. I have seen other ways to make wands if you have had some great results from any of those other methods let me know and maybe I can give it a try as well.
Harry Potter Week of Projects, The Cauldron
This was one of my favorite projects to do. I did not have particularly high hopes for how it would turn out. This may have been because I have not used paper-mâché since I was in fourth grade to do a project where I created the solar system. But paper-mache is pretty awesome. You can really create something out of nothing. Using a balloon and part of an egg carton for the shape, just some paper and modge podge to cover the balloon and egg carton to get the basics of the project. Put some additional layers on to give it more structure. Let it dry then pop the balloon. after that you need to put a rim on it with some additional paper and modge podge. After that dries it is ready for some paint. Once the paint dries you have an awesome cauldron that is sturdy enough to use for candy or treats.
Nightmare Before Christmas Jack Skellington Decorations
So this was another one of my pinterest fails. But after having completed it I think I could do a much better job on this. First off, I did not know what kind of string to use. Either thinkness would have worked, but to look like the pin, it would require the thinner string over the yarn. Most of what my attempt missed is a lot more string. I was being far to conservative with the amount of string I was using. Be incredibly generous with the amount of string you use. It will help it to maintain its shape and look a lot better in the end. Any ideas for another Nightmare Before Christmas project let me know in the comments.
Tuesday, February 10, 2015
Wine Bottle Jack-O-Lantern
This project was the start of my Halloween projects for the month of October. There are so many options for projects for Halloween but not all of them require me to drink a bottle of wine. So this is where I decided to begin my Halloween projects. Some orange paint, a little tape and a marker and you are all set. They used spray paint in the pin and I chose to be cheap, and buy the dollar acrylic paint, which was a regrettable decision. When I pulled the tape up, the paint was coming off with it. Spray paint was probably the way to go with this.
Filing Cabinet Transformation
It was about the time I did this project that I started to feel like I was getting the hang of doing these videos. Now I know I still have a lot of room for improvement, but I was getting into the swing of things and making time every week to do these videos and make sure I was being consistent with it if nothing else. This project was my favorite result that I have done so far. I turned out great and looks awesome in my apartment. It is a great project for anyone who has a filing cabinet that makes their office space look boring. An hour or two of work and it really changes how a room feels. I'm hoping to do more furniture transformation in the near future. If you have done or found any awesome furniture transformations let me know. I always love to fine more inspiration.
Women's Duct Tape Wallet
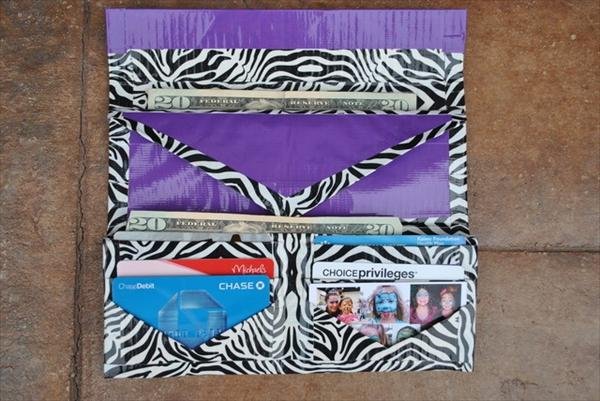
So when I started the simple duct tape wallet I realized I should go above and beyond something so simple. I figured it couldn't be much harder to do a woman's wallet. And yes I was wrong, it is much more time consuming and more difficult. The results I was able to come up with were also not as impressive. There is a lot more room for decorative options, but I figured with my skill level I should avoid getting into that aspect of it.
Simple Duct Tape Wallet
Watch the video here

I have seen some people do some amazing things with duct tape. And now they make all these awesome decorative tapes, making me want to try these amazing creations. So I thought I would start small. A duct tape wallet. Everyone and their moms have made one of these things at one time or another, or at least that is what it feels like with all the tutorials and images and ones you can buy online or at art walks. So I figured this could not be that hard. Now it not impossible by any means, but the medium is far less forgiving then I would have expected. It is difficult to cut, keep it in a straight line and not get it stuck to anything. Having said all that I would totally do it again. The results are pretty decent and I always enjoy making something that can be used on a regular basis. If you have any tips for working with duct tape or making duct tape wallets let me know.
Decorating a Hello Kitty Cake
Watch the video here
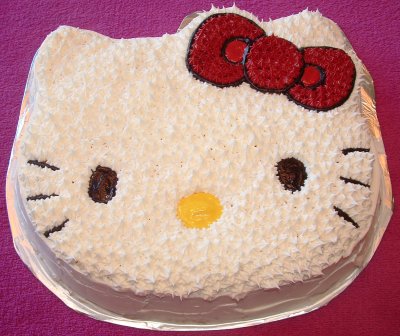
Decorating the Hello Kitty cake was my first real Pinterest Fail. I had a feeling this was not going to go well. I have had some disastrous experiences decorating cakes in the past. But I was on a roll with these projects turning out pretty decent so I had some high hopes. Unfortunately I learned the hard way that my cake decorating skills are pretty poor. So watch the video to see me destroy hello kitty face on a cake. Hopefully you at least enjoy delicious but terrifying results.
Monday, February 9, 2015
Polymer Clay Cat on a burger
Watch the video here

Since I had left over clay from the Sonic Screwdriver project I was looking for a new polymer clay project. I figured everyone on the internet loves cats and who doesn't love miniature delicious looking food. So this was the perfect project for me. The burger was the easy part of this project and really came together pretty quick and easy. The cat on the other hand was not as easy. Getting him shaped so he could fit purrrrrfectly on top of the burger without being to big or too small was difficult. But the end result was pretty cool. The whiskers being so thin were problematic and ending up breaking off shortly after I posted the video. It still looks like an adorable cat on top of a burger so I don't really mind.
Batman vinyl Wall Clock
Watch the video here

I really like how this project turned out. Although that could just be because it took a lot of time and effort to accomplish. The video on this one does not show all the work because somehow a huge chunk of the recording got deleted. But basically it is just constantly putting the vinyl in the oven for 10 to 20 seconds to get hot but not too hot that it warps. Cut what you can until it hardens too much, then start again. A short while after having done this clock I did some research on the complex vinyl cut outs I have seen all over the internet and pinterest. I guess they use a hot knife which would make this project super easy. If you are only going to do this once then go ahead and stick with the oven and scissors method. But if you are super in the vinyl cut out look then it might be a good idea to invest in a hot knife. I just looked it up and it seems like a hot knife is only about 15-20 dollars so might be a good investment for even one project. If anyone has used one before send me some recommendations for a good one that is reasonable priced.
I really like how this project turned out. Although that could just be because it took a lot of time and effort to accomplish. The video on this one does not show all the work because somehow a huge chunk of the recording got deleted. But basically it is just constantly putting the vinyl in the oven for 10 to 20 seconds to get hot but not too hot that it warps. Cut what you can until it hardens too much, then start again. A short while after having done this clock I did some research on the complex vinyl cut outs I have seen all over the internet and pinterest. I guess they use a hot knife which would make this project super easy. If you are only going to do this once then go ahead and stick with the oven and scissors method. But if you are super in the vinyl cut out look then it might be a good idea to invest in a hot knife. I just looked it up and it seems like a hot knife is only about 15-20 dollars so might be a good investment for even one project. If anyone has used one before send me some recommendations for a good one that is reasonable priced.
Cheap DIY air-conditioner from a cooler
Watch the video here
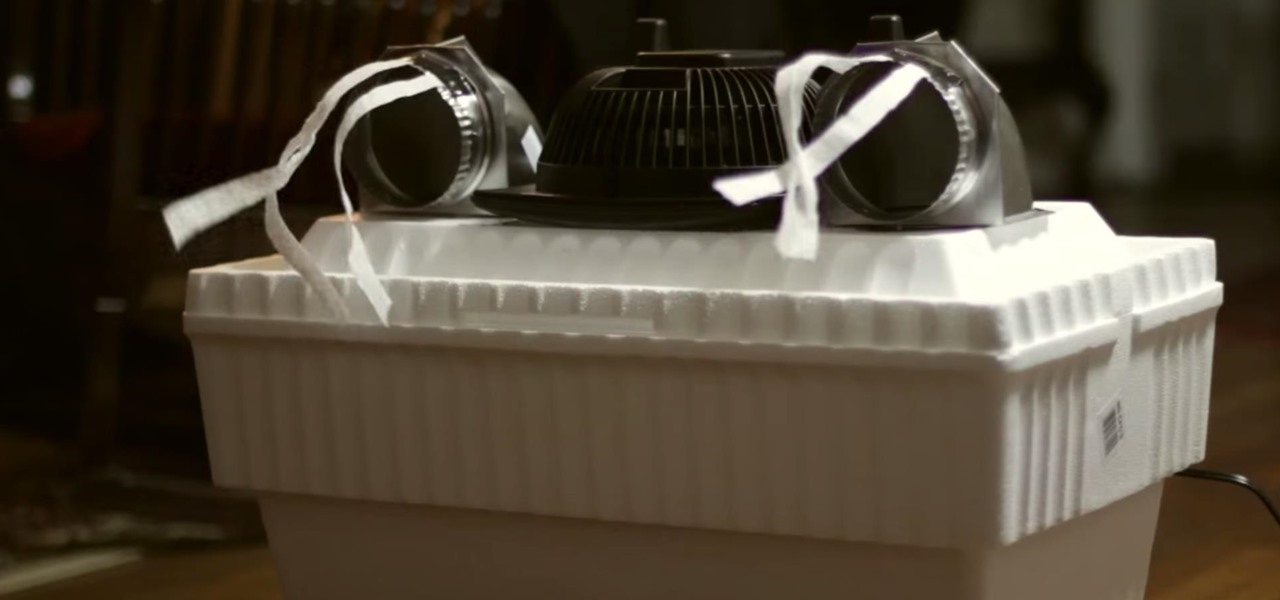
I made this cheap air conditioner last summer to help stay cool. It cost less than 20 dollars and was easy to make. But the results were less than great. Although it did help cool a small area near it, the change was not particularly significant. This summer I think I am going to attempt the bucket air conditioner that I have seen all over pinterest as well. Any tips or recommendations for something like this let me know.
I made this cheap air conditioner last summer to help stay cool. It cost less than 20 dollars and was easy to make. But the results were less than great. Although it did help cool a small area near it, the change was not particularly significant. This summer I think I am going to attempt the bucket air conditioner that I have seen all over pinterest as well. Any tips or recommendations for something like this let me know.
Doctor Who build your own Sonic Screwdriver with polymer clay
Watch the video here

This project was the first time I had ever used polymer clay so it was an adventure. I was not particularly worried about using clay since I had taken ceramics classes in high school and college. But I never was much for sculpting. My was more throwing on the wheel, more then well anything else. But it was nice to be working in the medium again. This project can be done pretty quick if you are only doing one or two. I used the whole bag of pens so I could have some to give out to my Whovian friends. So for me this project took quite a while and I felt like I was running out of ideas on how to design my Sonic Screwdriver. It was a lot of fun and I love how some of my pens Sonic Screwdrivers turned out. Don't make my mistake, if you are going to pull out the entire front part rather than just the ink, make sure you mark it correctly on the pens so they don't all have awkward gaps. Otherwise go crazy and make some super awesome sonic screwdrivers.
Crayon Art
Watch this video here

This was a super easy and fun project to do, and I have since found a number of similar projects that I would like to do in the near future. All you need to do for this project is hot glue on your crayons across your canvas or surface. Then take a hair dryer and melt them so they drip downwards. Do be careful as after a number of minutes with the dryer on it will heat up quite a bit and start to burn your hand. The result is fun and colorful.
This was a super easy and fun project to do, and I have since found a number of similar projects that I would like to do in the near future. All you need to do for this project is hot glue on your crayons across your canvas or surface. Then take a hair dryer and melt them so they drip downwards. Do be careful as after a number of minutes with the dryer on it will heat up quite a bit and start to burn your hand. The result is fun and colorful.
Crescent Roll Bacon Jalapeno Bites
Check the video out here

So in my first recorded Pinterest attempt I made easy jalenpeno cheese bites. They were indeed pretty easy. Although mine did not quite come out looking as nice as those pictured.

So in my first recorded Pinterest attempt I made easy jalenpeno cheese bites. They were indeed pretty easy. Although mine did not quite come out looking as nice as those pictured.
Well maybe that one did turn out as the pictures I was basing it off of. So basically they are as easy as they look. Cook some bacon. Preheat the oven. Put the yummy stuff inside and attempt to roll them into a ball. I would recommend putting the messy side face down to have the best result. Bake for 12 minutes and bam deliciousness.
Subscribe to:
Posts (Atom)